In this Article we will go over what a Notification is, the 4 options of how to Add an Automated Notification, and how to Edit or Delete Notifications.
What is a Notification?
The Notification feature is an optional set up and a way to send a system generated email or text Notification to specific Users for specific Issue Types submitted by field Users.
It is a great way to make sure Urgent or High Level Issues and priority incidents are not overlooked; especially issues that need immediate resolution and can't wait until the DAR is delivered the following day.
You can use this feature on a very basic level just to receive All Urgent Security, Maintenance, or Parking Issues or you be can notified of specific Issue Types as they are being reported.
How to Add a Notification
To set up an Automated Notification hover over the Users tab , and select Edit Notifications.
From the Choose User drop down menu select the User you want to add Notifications.
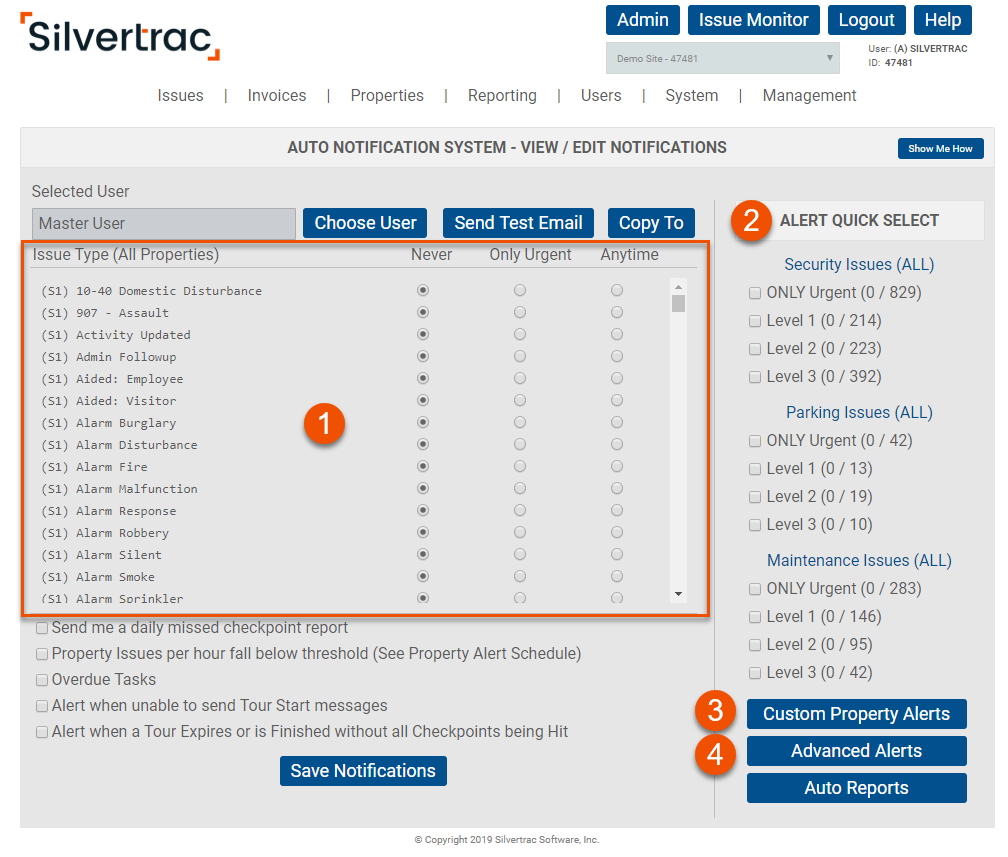
You will have 4 options for adding Notifications:
-
Notifications for All Properties
-
Notifications based on Issue Level
-
Notifications for a Single Property
-
Advanced Notifications.

Option 1: Setting Notifications for All Properties
When you select a User the Issue Types list will display for All Properties that specific User is assigned to.
As you scroll through the list of Issue Types you will see that there are three columns to select a corresponding check for when the User will be notified when that Issue is reported: Never, Only Urgent, Anytime.
Option 2: Setting Notifications Based on Issue Level
On the right hand side of the page there is an Alert Quick Select box that allows you to select Notifications based on Issue Types reported in Security, Parking and Maintenance. Additionally notifications can be added for each level: ONLY Urgent, level 1, Level 2 or Level 3.
Option 3: Setting Notifications Based on a Single Property
To Add Notifications for a Single Property click the Custom Property Alerts button. A pop up box will appear with a drop down menu that allows you to choose a specific Single Property from all the properties the User has access to in. Click on the Property you want to set Notifications for and the Issue Types list will display for All Properties. As you scroll through the list you will see that there are three columns to select a corresponding check for each issue displayed: Never, Only Urgent, Anytime.
Select the specific Issue Types you want Auto Notifications for and then click the “Save Custom Alert” button.
Option 4: Advanced Notifications
To create Advanced Notifications click the Advanced Alerts button. Select a Property from the drop down menu and select an Issue Type. Advanced Notifications are created using the “if” “then” logic.
-
Select an option from the If Occurs drop down.
-
Next select an option from the Within the Past drop down.
-
Next select an option from the On the Same drop down.
-
Click the Add Alert button to make the Notification active.
How to Edit or Delete an Automated Notification
Access the Notification the same way as adding a Notification and make the desired changes then select the Save Notifications button.
If you wish to delete an Advanced Alert simply click the Delete button next to the Advanced Notification you wish to delete.